


Creating a community on social media got a whole lot easier with the introduction of Facebook groups to a Business Page profile. Facebook Groups can be used to cultivate new customers and build relationships with previous clients, while keeping the tone friendly and fun.
However, there are steps and measures you should take to make the most out of the feature, that will benefit your business and your audience and make the most out of the engagement the group will receive.
How to Create a Group:
First things first, you’ll have to make the group. Forming a group is as easy as creating an event or sharing a milestone.
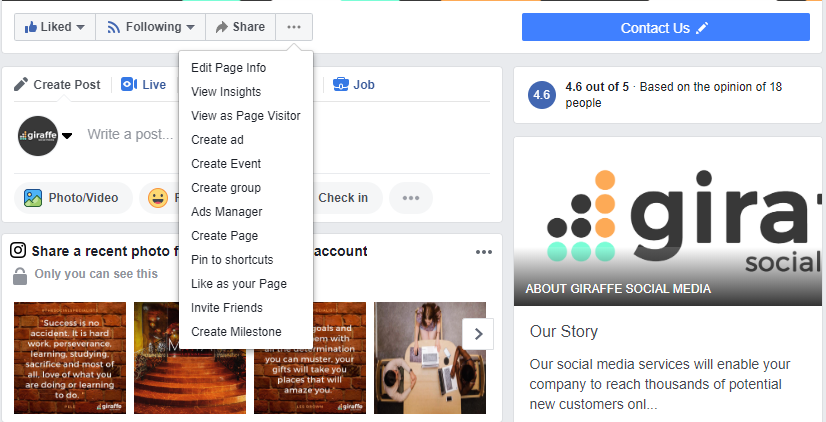
If the Group option is not already in the tab section on the left of your Facebook profile, then you can access the ‘Create Group’ link next to the ‘Share’ button above the ‘Create post’ section. See below:
After you select ‘Create group’, you’ll get a form asking you to enter the name of your group and to select the privacy of it. You have three options to pick from: ‘Public’, which means anyone on Facebook can find the group, see who’s in it and what they’ve posted before they’ve even joined it; ‘Closed’, which means anyone can find it and see who’s the admin, but can’t see the contents of what members have posted and finally ‘Secret’, which is pretty self-evident, only members of the group can find it, see other members that are in it and view and interact with their posts.
At the form stage, you can also preliminary add people to the group – Facebook will add your personal profile automatically, so if you want your identity to remain hidden, it’s best to select the cross and remove yourself off the members’ list. Finally, click ‘Create’ and you are all ready to go.
Next Steps
To make it easier for people to find your group, you can add it to the tabs on the side of your profile, along with ‘Services’ and ‘Offers’, this way your audience are more aware of the group and can join without you having to share the link on your page continuously. Go to ‘Settings’, then ‘Templates and Tabs’ then configure and set up the ‘Groups’ option. You can also drag it higher to the top of the list, so people are more likely to see it when they click on your Business Page.
Before you start adding members, you can set up a questionnaire for people who want to join. This is essential for businesses who only want their community and customers involved in the group and emits all those members who only want to join to share fake news and advertise their own products or company. Membership requests can only be seen by the group admin and its moderators, so people are more likely to fill it in and you can judge whether they are suitable for your group or not. For example, if you were setting up a group for a company that works with lots of different businesses, you would be able to make sure that the people joining are employees at one of the associated corporations. You can only ask three questions, so make them count.
Next, you should fill out your group’s description. Make sure you make it clear in the first two sentences what the purpose of the group is. For instance, if you were an author and wanted to build community among your readers, you should write a short paragraph on what you will share, how you will personally communicate with your audience and how the group will help them (e.g. you could say you will share writing tips or when you’re performing book readings).
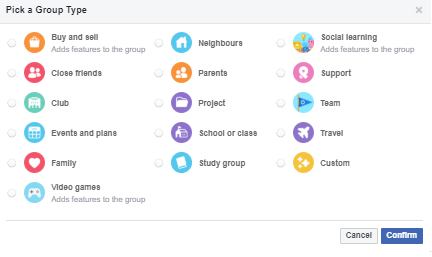
Also, in the group’s settings you can choose its type, which will help the right people find your group. If you’re offering mentoring or one-to-one personal development, you could choose ‘Support’, which will help those looking for it, find you. If you’re a travel agency posting external links from your blog about the ‘Top Ten Places to See’, then you would pick ‘Travel’. Some types even add extra features to the group such as ‘Video games’, ‘Buy and sell’ and ‘Social learning’.
Furthermore, you can choose your location (preferably choose where your business is located) and add any apps that you think may benefit your group such as Messenger bots and Shopping tools, which add extra features to your group and offer members a more personalised experience.
You can write up to five tags that will help people find the group if they’re interested in that tag. For example, if you were an e-commerce clothing company, you should select ‘Fashion’, meaning those who find it know what your group is about before joining it. Also, you can pick one of nineteen different colours to be your group’s theme – one option actually matches up with the colour of your group’s cover photo if your brand is big on consistency.
Finally, you can add sections into Facebook Groups such as social learning units which help people learn new things, change posting permissions and even edit the Story post approval too.
Make the Rules of the Group Known
However, it’s also really important that you state the rules of the group and what can and cannot be posted in it. Make sure you prohibit swearing, discrimination and anything considered rude and bad behaviour and warn offenders that they will be banned from the group if they break the rules. You can set up the rules when you first create the group and select from the options Facebook provides, or simply write your own and add it to the description.
What Can I Use the Group For?
With Facebook Groups, the world is your oyster. Groups are a lot more personal than a Facebook Business page as they offer all different types of posts and a sense of a smaller and closer community.
Groups can offer help and advice. You can add topics, so group members can find the information they are interested. You can also add recommended groups, so if you have multiple communities you can link them altogether. You can share links from your own blog, generating traffic, or build a relationship with others from external links. Admins and moderators can answer frequently asked questions too.
It’s also greatly beneficial for your business as you can share offers, company news and products, on a more informal level. You can ask your audience’s opinions and get a grasp of what they want, and what they dislike. In a group, you are far more likely to get engagement and build relationships and trust between consumer and company. It really is a chance to connect with your audience and find out what will make them use your service, or buy your product, but by being far less direct and pushy.
Different Post Types
Facebook groups also offer a lot of cool post types that normal Business pages do not that can encourage engagement among your company and get your audience not only talking to you, but to other members too. For example, you’ve got your usual ‘GIF’, ‘Check In’ and ‘Feeling/Activity’ options, but you can also select ‘Watch Together’, which allows the audience to watch, talk and react to the same videos shared publicly on Facebook simultaneously. The group admin is in charge of what videos are played and you can invite people to come join you. It’s like inviting all your friends to virtually go to the cinema, but the film is Facebook videos and your friends are potential customers.
Also beneficial in the group are the ‘Polls’ feature. Facebook polls are great for engagement and getting an idea of what your audience like. On Facebook Business Pages you can only select two possible answers to your question, however in a Facebook Group you can write multiple responses and keep adding options to your heart’s content – that means you can literally ask your audience which one of your products or services they like best. You can also select images or GIFs to go with your answers to generate more interest in the post.
Facebook groups can also host events, and once they’ve occurred, you can view the past ones in the ‘Events’ tab. Hosting an event in a group is a great way to target those who are already interested and knowledgeable about your product or service. They are more likely to attend as a relationship has been built through the community of the group.
The Facebook Sky’s the Limit
Facebook groups are fun and an informal way to engage with your audience. However, it’s important to monitor the comments and posts in the group and stay on top of what the members are saying. Make sure posts in the group are always linked back to your business, so you rightly receive the traction. Keep things light-hearted but remember to talk about your services and products frequently. Always respond to comments and posts in the groups to keep engagement high and to show you’re interested in your audience’s thoughts and opinions.